Work in progress Catbus

A while back, I was asked to make a Catbus and of course, I couldn’t decline. I’ve been working on it a little bit, trying to write out the pattern as I go, but progress has been slow. Mostly because of work and other social obligations, but also because things aren’t really going as smoothly as I’d like them to. I finally finished the head today. I think the face looks a bit iffy, but overall, it could look a lot worse.

image

image

Well, here’s hoping things will start to look up and I can present my friend with a Catbus soon!

Cheers, Lydia

It’s so fluffeh!

Today, I’d like to talk a bit about materials.
Normally, I use plain and simple yarn for my projects. Here in the Netherlands, the brands that are the easiest to get are Katia and Phildar. These brands come in all kinds of colours and thicknesses, which make them perfect choices for anything you need to make. Phildar is usually a bit shiny and more rugged, with bright and bold colours. Katia is softer and can thread apart a bit easier, but this brand has softer colours. So both have their strong and weak points.

But sometimes, you feel in need for a real eye-catcher. And that’s when I usually turn to fuzzy yarn.

It can be a downright disaster to work with, but once you get the hang of it and aren’t focussing too much on whether or not you have the right amount of stitches, it is one of the most wonderful materials to make amigurumi with. At first you really have to experiment with the yarn. Try out different hook sizes and make sure you have enough light. If you normally work on you crochet in the evenings, make sure you have a strong lamp right on your work or I can guarantee quite a bit of frustration. I prefer natural light when it comes to this type of yarn, since it makes it much easier to see your stitches. Also, it is important to work ‘inside-out’ with this yarn, since most of the fuzzies end up inside you work otherwise. Luckily, with this yarn you can’t really tell which side is which, so it’s pretty much invisible if you just turn your work ‘wrong-side out’ in the end. There really isn’t a definite wrong or right side with this stuff! Sounds great, doesn’t it? Well, to be honest, it really is. But it does take a lot more time and effort to make a full project with this yarn, so I usually just use it as a detail.

I have used different brands of fuzzy yarn, but I have to admit that I don’t really have a favourite yet. It all depends on what look you are trying to achieve.
The brands I have used so far are: Katia Brazilia, Katia Coral, Schachenmayr Nomotta Bravo Color, Phildar Phil Douce and the house-brand of a local store (Zeeman).
Brazilia and the house-brand are the hairiest of the brands I’ve used. These can be hard to use, since all the fluff gets in the way of your stitches. But at the same time, this gives a really nice effect, almost as if you didn’t crochet the work at all!
Coral and Bravo Color have shorter, quite stiff fluff, which does give the fuzzy effect, but isn’t nearly as huggable as with the first two. These brands are easier to work with though, because they aren’t so fluffy that you can’t see your stitches anymore.
Phil Douce was awesome to work with, since it’s so very soft and doesn’t have long fluff at all. It is easier to see your stitches, but not as clearly as you would with regular yarn. It does come out a bit different than other yarns, so it’s important to keep an eye on your work and how it is supposed to look when it’s finished. Sometimes, you need to adjust the pattern a little to get the shape you want. Also, this yarn just makes your work very, very soft. It doesn’t really have that furr-look that the others have.

I’m sure by this time, you are all tired of my rambling and want to give your eyes a rest. But before you do, I’d like to share some pictures of a couple of stuffed animals I made with the fuzzy yarns. Picture time!

My first attempt at using fuzzy yarn.

My first attempt at using fuzzy yarn.

The camel was supposed to have two humps, but I really lost count of my stitches with this one. So, it became a dromedary camel ^_^

Foto0438

Funky Sheep

The head of this sheep is made with the house brand, but it didn’t really come out the way I wanted it to. So I made the body using Bravo Color and that looked a bit better. I never got around to make a new head for the poor thing, so it has to make do with two types of yarn. (my apologies for the blurry picture)
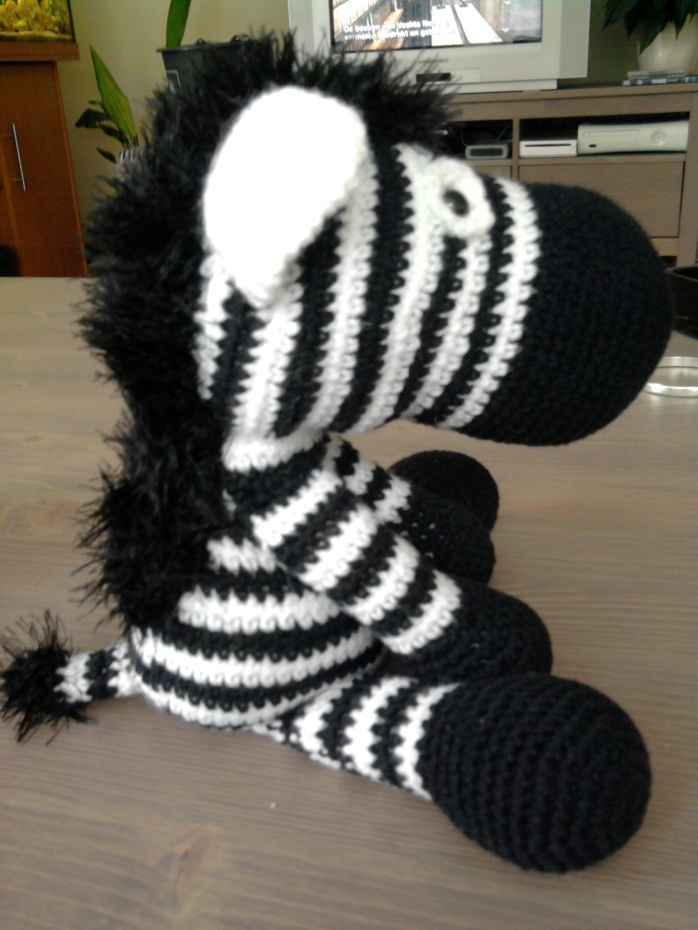
Foto0395

a Zebra, obviously

The manes for this zebra are made with the house brand. They did come out a bit bigger than they should have, but this is because I kept following the pattern with a bigger hook than the one I used for the body. With these types of things, it’s important to keep an eye on your work and simply quit when it is big enough to go with the rest.

Foto0346

Awesome Lion

This one really made me happy, since you use the fuzzy yarn for the last part of the head. So it’s a simple case of decreasing your stitches until the hole is small enough to be sewn closed. It is important to keep an eye on the head and make sure that you don’t decrease too fast, otherwise, the head becomes quite flat. For this one I used Katia Brazilia.

DSC00751

SQUIRREL!

The tail came out a bit too big at first and then, I couldn’t get the shape exactly right, but I still think it looks really cute on him!  It is made using Katia Brazilia.
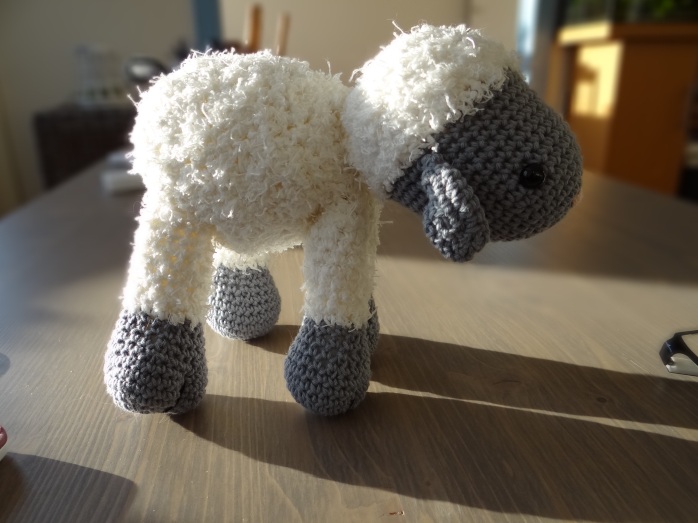
DSC00202

Another sheep

This one is made with Katia Coral. It’s a bit easier since you can see your stitches, but then again, I think this would look a lot cuter with a bit more fluff to it.

412513_287002511407499_1650571654_o

Frog and Dog, I don’t have a picture of the dog on its own…

The dogs ears are made using Katia Brazilia. They did come out a bit small. This is due to the fact that I had to ration my yarn, since I only had a little less than one skein for this project.

177794_281517918622625_449762420_o

Little polar teddy bear

This one is (almost) entirely made of Phildar Douce. It doesn’t have that long furry look, but it is so amazingly soft. It was an absolute horror to make though, since the shape didn’t exactly come out when I followed the pattern. So it took quite a bit of tweeking to get this one right. It’s still one of my favourite fuzzy works though!

There are a lot of other fuzzy yarns for sale all over the internet and I’m sure you can find it in your local craft or yarn store. Be sure to give it a try, it’s a great challenge that comes with some wonderful results!

Cheers, Lydia

Something else entirely

Sometimes, I don’t want to crochet anything. As shocking as it may seem, this can happen quite often ^_~ Luckily, I know other ways to pass the time, such as reading a good book and watching some tv. But every once in a while, that just doesn’t seem to be enough.

Around the same time I learned about crocheting, I stumbled upon another crafty passtime that blew over from Japan: folding Lucky Stars. Basically, you take a long strip of paper, knot it at first and then you start to fold it over itself time and time again, until you are left with a little piece at the end, which you fold into the star and then you puff it up by squeezing the sides. It’s fun to do and the strips of paper you can use for it are pretty much always printed with the cutest patterns.

Lucky Star paper strips

Lucky Star paper strips

I especially enjoy the shiny ones, not only because they look pretty, but also because the paper is a bit thinner and easier to fold.

Anyways, here are some pictures to show you guys how it’s done. Please don’t pay too much attention to my fingers and nails. The weather has been extremely dry around here lately and my nails still haven’t recovered from the acrylic nails I had put on for New Years.

Instructions

Instructions

First, you loop the paper

First, you loop the paper

Then, you pull the short end through the loop

Then, you pull the short end through the loop

Pull it tight and flatten the piece, you start to see the five-sided shape

Pull it tight and flatten the piece, you start to see the five-sided shape

Fold the short end over the knot and start folding the long end along the back of your work

Fold the short end over the knot and start folding the long end along the back of your work

Keep folding the long side over and over until you are left with an end that's not long enough to fold over completely

Keep folding the long side over and over until you are left with an end that’s not long enough to fold over completely

Stuff the last bit into the folds so that you don't have the end sticking out

Stuff the last bit into the folds so that you don’t have the end sticking out

Now, you have a flat star, but you still need to puff it up

Now, you have a flat star, but you still need to puff it up

Squeeze in the sides with your fingernails

Squeeze in the sides with your fingernails

If you do this all around, you get a nicely puffed up star!

If you do this all around, you get a nicely puffed up star!

I have been doing this for a while now and it can be pretty addictive. I try to limit myself by only letting me buy the paper strips at conventions. I got my first batch at Abunai! in august 2012 and went through it like a madman. Then, I had to wait until Tsunacon 2013 (two weeks back) to get some more. Here in the Netherlands, you can also order them online from Most Cutest. The people who run the website also give workshops at some conventions. At Tsunacon, they could even be found with their own table in the dealer room. Which was extremely crowded, but I still managed to get a good stash of new strips ^_^

I’m currently at around 850 folded Lucky Stars. I keep them all in a big jar which I really want to get completely filled up. Which could be pretty soon… I hope at least 1000 Lucky Stars will fit in there.

I wonder how many I can fit in here...

I wonder how many I can fit in here…

There are some numbers of lucky stars that have special meaning:
1 star: The only one
2 stars: Happy Couple
9 stars: Love for a long time
55 stars: Love you
99 stars: May the friendship/love last forever
365/366 stars: Whole year blessing
548 stars: Can’t stop loving you
999 stars: Endless love
1314 stars: Eternity love

So if you want to give that special person some extra happiness and luck, make sure to fold the right number of stars ^_~

Cheers, Lydia

Jurassic Park

A while back I read that Steven Spielberg will be making a fourth movie in the Jurassic Park series. The first three movies have sentimental value for me, since I watched them first when I was still a kid. I’ve seen them all quite a few times since then and still love to watch them. Especially when I know a scary part is coming up and I start to brace myself in order not to get scared and thus get more scared when it actually happens 😛

Also, a new second-cousin is coming soon, so it was time for me to start work on a baby-present. It’s going to be a boy and I knew just what to make: a bunch of dinosaurs!
Crochet dinosaurs

The pattern is from Ana Paula Rimoli, who seems to be able to make anything look extremely cute. Here’s a link to her Etsy shop! Give it a visit if you want to make these cute guys yourself.

First, I started on the Triceratops. I love these dinosaurs, with their fierce looking horns and gentle behavior (as far as I know that is…)
I used two shades of green for his body and a nice contrasting white for the horns.

Triceratops from the side Triceratops front

He does tend to make headstands when I try to let him stand on all fours, so I need to press him down a bit. Looks like he’s too heavy for his little back legs, doesn’t it ^_~

Then it was time for a Brontosaurus, which are awesome because of their long necks and tails. The “Veggie-saurus” as it is called in the first movie, gotta love those kids.
I used light greyish browns for this one, because it needs to be able to camouflage itself. It doesn’t have the sharp spikes to defend itself with after all.

Brontosaurus Brontosaurus

She lets her head droop a bit to the side, but then again, doesn’t that make her look even more friendly?

But, no ecosystem is complete without a predator and so, it was time to make the star of the Jurassic Park movies: a T-Rex! This one looks as though he is a vegetarian as well, though, so he was welcomed into the group without hesitation. A bold combination of blue and grey seemed perfect for him.

T-Rex T-Rex

All together they make a lovely little group and I’m pretty sure any little boy would love to have them ^_^

Cheers, Lydia

Mog in action

I’m afraid I’m starting to bore you guys with my rambling about Mog, the giant life-sized crochet Moogle. But yesterday, I finally got to see him in action when my sister-in-law competed in the Cosplay Fashion Show at Tsunacon. And what’s even better, she won first prize! So congrats to Syrupcookie and Mog, who helped a little bit too, of course ^_~

First off, some pictures!

Final Fantasy cosplay group picture, all look really awesome to me!

Final Fantasy cosplay group picture, all look really awesome to me!

Some of the cosplayers awaiting judgement, Syrupcookie is the second from the left (obviously ^_~)

Some of the cosplayers awaiting judgement, Syrupcookie is the second from the left (obviously ^_~)

Syrupcookie made the wand to really finish up Mogs look

Syrupcookie made the wand to really finish up Mogs look

And here’s the YouTube video of her act:

Some links to my sister-in-laws cosplay pages:
Syrupcookie on Deviant Art
Syrupcookie on Facebook

I promise, this will probably be the last post about this little dude! That is, until I decide to write out the complete pattern…

Cheers, Lydia

Totoro family

One of the first online patterns I used was that of a blue Totoro by Lucy Ravenscar.Blue Totoro, pattern by Lucy Ravenscar

I gave it to my sister-in-law, who loves anime just as much (maybe even more) as I do. I’ve always been in love with almost every movie by Studio Ghibli, but “My Neighbour Totoro” holds a special place in my heart.

Sometime last year, I ran out of projects and decided to ask my facebook friends what I should make. One of them requested a Totoro. Usually, I really hate working the same pattern twice, but with this one I couldn’t resist. Lucky for me, Lucy changed her pattern slightly to accomodate for a big grey Totoro and made patterns for the smaller blue and tiny white ones as well. So it was decided, I needed to make an entire family of Totoros! You can find her blog entry and links to the patterns here.

In the meantime, please enjoy some pictures of the ones I made using these patterns!

Grey totoro frontview

Grey Totoro frontview

Grey Totoro sideview

Grey Totoro sideview


Grey Totoro from the top, the tiny white one can sit on the leaf!

Grey Totoro from the top, the tiny white one can sit on the leaf!

Tiny white Totoro

Tiny white Totoro

Blue frontview

Blue Totoro frontview

Blue sideview

Blue Totoro sideview

Blue and white together

Blue and white together

Another family picture

The whole family together

The whole family together

Another family portrait

The same friend surprised me with a new challenge: he wants a Catbus! I’m still trying to decide whether I will use a pattern I found online (there are some pretty good ones out there) or if I will try to make a new pattern of my own… Time will tell, since I don’t really have the time for such a big project right now -_-”

Cheers, Lydia

Birthday spoils

This weekend I got to celebrate my 26th birthday. I enjoyed a day full of visits from family and friends and got spoiled rotten with presents. The loot included a couple of crochet pattern books. Some, I had wanted for a while now and some, I didn’t even know existed. One of my friends decided it was time for me to learn how to knit as well. Either that, or she couldn’t remember whether I was into knitting or crochet ^_~

Funny thing is, two of the books I recieved were for making Christmas ornaments. One for crochet, one for knitting! “Kerstballen haken” by various authors (Crochet Christmas ornaments, I don’t believe there is an English version of this one) and “Kerstballen breien met Arne & Carlos” by Arne Nerjordet and Carlos Zachrison (55 Christmas Balls to knit).

I got two more Dutch pattern books, one from my wishlist: “Amigurumi & Forest friends” by Tessa van Riet-Ernst. The other one was a surprise to me: “Nog meer minihondjes en beestjes haken” by various authors (Even more crochet minidogs and animals once again, I don’t think there is an English version). From this book, I already had a couple of patterns, since I own all the books from one of the authors, but there are still quite a couple of fun looking ones in there that I didn’t know already.

And then there were two English pattern books on my list: “Super scary crochet” by Nicki Trench and “Creepy cute crochet” by Christen Haden. So, if we ever decide to celebrate Halloween, I won’t have any trouble making decorations for that ^_^ I especially love the patterns in Creepy cute, they look so easy and fun to make! The patterns from Super scary crochet are a bit more elaborate and turn out less cute and more scary.

So, it looks like I will be busy making lots and lots of new ami’s. Plus, I have to learn how to knit!
In about three weeks, I’ve got two weeks of vacation time coming up, so I know I won’t be bored.

Cheers, Lydia