Pun intended

I love British humour. Especially its use of puns is something that always gets me. Sadly, most of these jokes are hard to translate into Dutch, making some of the puns impossible to understand if you’re not all that versed in the English language.

I always thought this was something mostly done by the British, until I came upon the crochet patterns of DenDennis, a Dutch amigurumist. He has been able to capture some almost ancient Dutch words in crochet, with an amazing sense of humour. In this post, I will try to convey three of them.

First up is ‘Snotaap’:

wpid-fb_img_1435581606975.jpgThe word Snotaap can be literally translated to Booger/ Snot Monkey. It’s a word that is mostly used for children that are a bit rude or cheeky (I believe ‘Cheeky Monkey’ is a term that is used in English). DenDennis decided to actually design a monkey with some snot hanging out of its nose.

Then there is ‘Sloddervos’:

wpid-20150616_214122.jpgSloddervos (as literally as possible translated: Sloppy Fox) is the term we use for people who are a bit chaotic and don’t neatly put away their things. They will usually have a lot of stuff lying around their house or room and will most of the time have a hard time finding items. I’m not entirely sure what the English term for someone like that is. The one that comes to mind is a pack rat or hoarder, but then again, those people usually also collect a lot of items, which isn’t necessarily the case with a Sloddervos. The amigurumi that fits this description is, of course, a little fox composed out of some different colours and with little patches sewn onto its body.

And lastly, there is my personal favourite: ‘Ouwe Taart’

wpid-20150619_213934.jpg
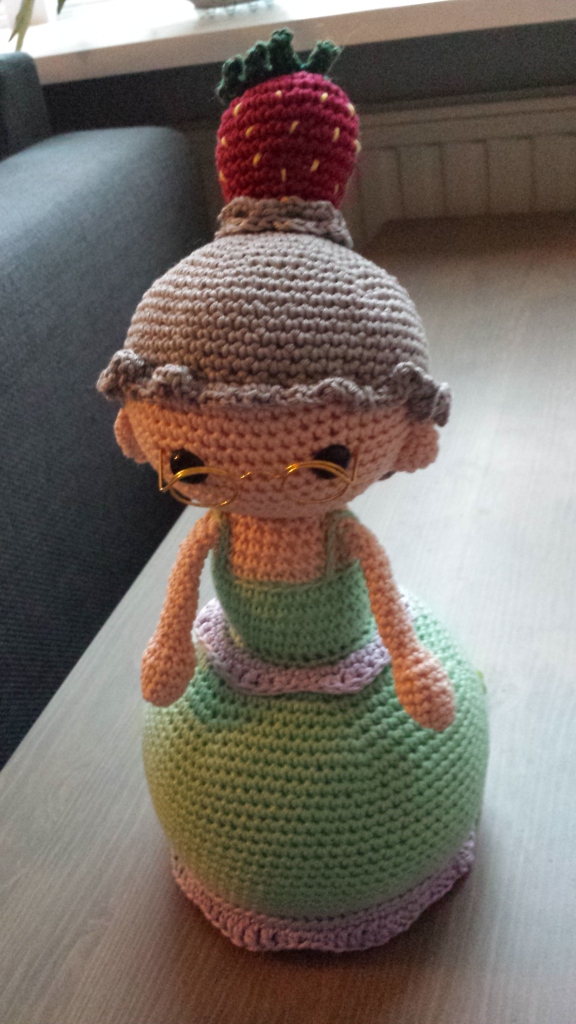
Ouwe Taart (literally: Old Cake) is a term the Dutch use as a bit of an insult to elderly women. Old hag or old biddy (which is a little less offensive) are the terms that I can think of when trying to find the English equivalent. DenDennis brilliantly translated this term into amigurumi by basically making a grandma that is dressed up as a fruit cake.

There are many more great amigurumi puns in DenDennis’ two books: ‘Prettig Gestoorde Amigurumi’s’ (Totally Insane Amigurumi’s) and ‘DenDennis Viert Feest’ (DenDennis Has a Party) which are both available in Dutch and German (the second one is scheduled for release on the first of August) but sadly, not in English. Hopefully, in the future, these patterns will be translated so that more of the world will get to know a little bit of our Dutch puns. Because frankly, I wouldn’t want the world to live without amigurumi’s such as ‘Partypooper’, ‘Pakezel’, ‘Kletsmajoor’, ‘Soepkip’ and many, many more.

Edit: shortly after posting I got a message from DenDennis stating that he does have his characters and patterns from the first book translated to English, but that he is still looking for an international publisher to publish the books in English. So if you happen to know of such a publisher, don’t hesitate to point them in the direction of this great Dutch designer!

In the meantime, you can surely enjoy other patterns from DenDennis. He has several free patterns and some paid, which can all be found through his website.

Cheers, Lydia

PS: I know I have not posted anything for a long time. A lot of things have been going on and I simply haven’t had the time, energy or inspiration to update. If you want to know what’s on my hook, give my FaceBook page a like. Here you will regularly find pictures of recent projects ^_^

There, I fixed it

I love jeans. They’re the only kind of pants I wear to be honest. But sometimes, my jeans don’t love me back. Like this one pair, that had the little worn patches like so many jeans you can get nowadays (talking like this makes me feel old, but I don’t really know another way of saying it -_-” ) anyway, those worn bits are prone to truly tearing sooner rather than later. And I do not love holey jeans (especially since my legs are as white as can be) luckily, I came across this great idea while browsing the world wide web: fix your jeans with crochet! So that’s what I did, and here’s the result:

image

The holes stretch as I wear the jeans

image

Crocheted some simple patches, just increasing 6 stitches in the round until they were big enough

image

Sew them on the inside

image

Sew some ‘concentric’ circles on the outside. While this attaches the patches a bit more secure, it also looks nice

image

And now, when I wear them, you don’t see snowy white skin but pink fabric, yay ^_^

image

What is the best (crochet) idea you picked up from the Internet?

Have a great weekend! Cheers, Lydia

Projects, projects everywhere!

I’m back! And still insanely busy… In between the holidays, a very busy time at work, getting sick a couple times, and having my birthday, I’ve been working on loads of little projects that just didn’t seem to want to be made into a blog post. Thus, I’ve decided to try and put them all in one.

So here’s a quick overview of what I’ve been up to:
image
I made a bunch of stuff to sell with Tegendraads at Gamepitcon last January.
image
Finished work on the blanket I started back in October/November (still need to somehow attach the fleece that I bought for the back)
image
Made some cute felt owls with a kit I bought way back at the Kreadoe
image
Went to the Haakathon for the Dutch leprosy relief and made a couple ‘red cats’
image
Went to the opening of a new Crochet store by the girls behind Briljant Crochet (they seem to really be living the dream!)
image
Made some cards with a kit I got for my birthday.

And together with my friend Doretta, we taught two more people to crochet ^_^ I hope they enjoyed it and are still working on their skills.

Right now, I’m working on Vlad the vampire bat by Lalylala. Using this:
image
A ball of awesome ‘magic swing’ yarn from Briljant Crochet. It’s got a little sparkle mixed in it ❤ but I have to work it together with my normal yarn, which made for some hard work. Thankfully it's almost done now!
image
Magic swing in action, it’s a lot of fun to watch the balls of yarn taking shape.

After Vlad is finished, I’ve got a couple projects lined up already (african flower crocodile, a froggy coin purse, actually really finishing the blanket, maybe even start on another blanket with the Stylecraft CAL in April) I hope to be making more blog posts again in the future! I’ll probably elaborate a bit on the Haakathon in a later post ^_^

Plus, something totally not crochet or craft related, I got a new fish tank!

What have you guys been up to?
Cheers, Lydia

Fabulous flamingo

This was a project I’ve been wanting to do for a long time now. The pattern is from ‘Crocheted wild animals’ by Vanessa Mooncie. The feathers gave me quite a bit of grief, but luckily there’s always the crochet community to turn to and after someone noticed it looked like the crocodile stitch (which I had heard of, but never used) things went a lot smoother.
So here’s the result:

image

The first feather, I was so happy when I'd figured out how to make them

image

All feathers. Thankfully they're made in one go and I didn't have to sew them on one by one

image

Full flamingo, I love his looooong legs ❤

image

Now that this project is done, I might get time to work on a project for this year’s amigurumipatterns.net contest. I will keep you posted ^_~

Cheers, Lydia

Kreadoe 2014

Last Saturday, Doretta and I went to the Kreadoe. This is a huge arts and crafts fair in the Netherlands, with tonnes of stands promoting different crafts and selling the materials you need.

We went last year as well, but didn’t really enjoy ourselves as much as we would’ve hoped. So this year, we weren’t sure if we would go at all. Eventually, we both decided that we deserved to have a nice “girl’s day out” and went anyway. Luckily, this time we knew what to expect and we came prepared. I’d checked out the site already, and found a couple workshops that I wanted to attend. On the day itself, I ended up doing other things, which were just as much fun nonetheless.

My yarn wish-list was pretty big, since I had a couple of projects that I wanted to get started on, or was in the middle of when I ran out of the right yarn. I ended up buying loads of different things, but hardly anything from my wish-list. That’s the fun bit about this kind of fair. Since it’s not focused on crocheting alone, you can get into contact with some other crafts that you might like just as much (or maybe even more)

As for the workshops, the two that I attended were the following: covering a Styrofoam heart with moss and other natural materials, and making an origami Christmas ornament. And here are the results:

The paper is kind of shiny, so pretty <3

The paper is kind of shiny, so pretty ❤

I made a number plate for our house ^_^

I made a number plate for our house ^_^

Like I said, I bought loads of different things, so here are some pictures of my haul:

Everything put out on the table

Everything put out on the table

The yarn I bought. I ended up buying two versions of almost the same colour to start on a flamingo pattern I'd wanted to make for a while now. Turns out I can now make a small army of flamingos if I want to... I really love the multicolour yarn, and I'm rather glad that I didn't know the price until I went to the register (man, pretty multicolour yarn is expensive!)

The yarn I bought. I ended up buying two versions of almost the same colour to start on a flamingo pattern I’d wanted to make for a while now. Turns out I can now make a small army of flamingos if I want to… I really love the multicolour yarn, and I’m rather glad that I didn’t know the price until I went to the register (man, pretty multicolour yarn is expensive!)

Of course, I couldn't resist to buy a package that lets me make a cute owl out of felt <3

Of course, I couldn’t resist to buy a package that lets me make a cute owl out of felt ❤

A set to make a Styrofoam fish. I loved the finished ones they had at their stand and couldn't let myself walk away without a set to make one of my own

A set to make a Styrofoam fish. I loved the finished ones they had at their stand and couldn’t let myself walk away without a set to make one of my own

Little tiles to make a mosaic with

Little tiles to make a mosaic with

And lastly, a set of three cute little vases

And lastly, a set of three cute little vases

I already made the mosaic inside a little tray. I just need to fill the spaces between the tiles. And the flamingo is halfway done. I ran into a little problem with the way the feathers are crocheted, but thanks to the lovely crochet community, I got some helpful tips and should soon be well on my way to finish it. Other than that, my head is brimming with ideas and inspiration. Let’s just hope I don’t lose it before everything is finished up.

Do you enjoy looking at other crafts, or do you prefer to stick to what you know? I love to experiment a little bit (or else, I would have never started to crochet!)

Cheers, Lydia

Sorting the ‘stash’

I’m sure you all know the feeling. You need that one particular colour, but your stash is so messy that you end up spending endless amounts of time digging through it all to find what you’re looking for.

A while back, I got a nice big trunk to store my yarn in and I figured if I kept the colours together, I wouldn’t have to spend too much time looking for anything. Man, was I ever wrong. Eventually, my stash ended up looking like this:
DSC05987
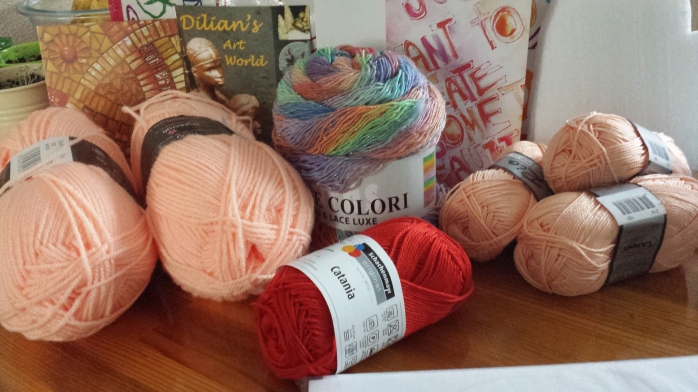
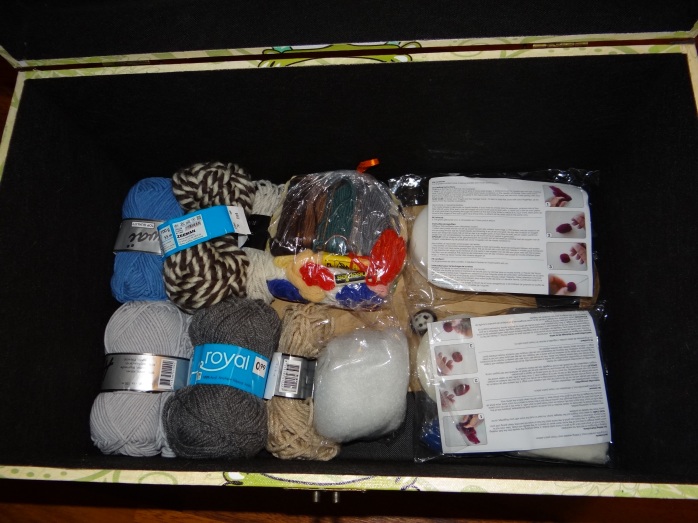
I decided that I needed to do something, or I would have to keep buying more and more yarn because I couldn’t find that one skein that’s hidden all the way at the bottom. The perfect idea came to me when I read a post from All About Ami about making a DIY Yarn Storage. I needed compartments in the trunk to sort my skeins. I thought I’d found some at Ikea, but as it turned out, they didn’t fit. (They did fit perfectly in the drawers of our new wardrobe, so our socks and stuff are sorted as well)
That’s when I realised, I could just as easily make something myself.

And today, I finally set myself to work on it.

Everything I used: a piece of foamboard, two big pieces of cardboard, a pencil, scissors, box cutter, measuring tape, hot glue gun and something that helps you draw straight lines

Everything you need: a piece of foamboard, two big pieces of cardboard, a pencil, scissors, box cutter, measuring tape, hot glue gun and something that helps you draw straight lines

Plus, of course: a cup of tea. (optional)

Plus, of course: a cup of tea. (optional)

I cut the foamboard in two pieces that fit inside the trunk when laid flat. These make the base of the compartments, so I could fit multiple layers inside that were easy to lift up. It’s important that the underside is nice and sturdy, to that it doesn’t bend or break under the weight of the yarn. The dividers don’t need to be as sturdy, so I used the thinner cardboard. It’s actually pretty nice that they give way a little bit, so you can squeeze in that last skein. I think it’s easiest (for me to type and less text for you), if I just show you in pictures how I made the compartments.

First, I divided the foamboard in two fitting pieces

First, I divided the foamboard in two fitting pieces

Then, I measured the strips to make the dividers

Then, I measured the strips to make the dividers

Cut them all and then used the hot glue gun to attach four of them around the bottom

Cut them all and then used the hot glue gun to attach four of them around the bottom

After glueing, you get this

After glueing, you get this

Time for another cup of tea!

Time for another cup of tea!

Cutting notches so that the dividers can be placed together

Cutting notches so that the dividers can be placed together

The dividers put together

The dividers put together

They can also be folded if I ever decide I don't need them for a while

They can also be folded if I ever decide I don’t need them for a while

The complete compartment. The dividers are loose, so they can be taken out or replaced if need be

The complete compartment. The dividers are loose, so they can be taken out or replaced if need be

Time to cuddle with the cats before I start on the sorting

Time to cuddle with the cats before I start on the sorting (they look totally happy to see me in this picture :P)

The bottom holds a couple skeins that I don't use very often, since it's bigger yarn, plus some tiny skeins, needle felting materials and a little bit of stuffing.

The bottom holds a couple skeins that I don’t use very often, since it’s bigger yarn, plus some tiny skeins, needle felting materials and a little bit of stuffing.

The second layer holds one of the compartments

The second layer holds one of the compartments

And then there's the top layer with the second compartment

And then there’s the top layer with the second compartment

A sorted stash is a happy stash! Hopefully it will stay neat this time ^_~

How do you sort your stash? Is it sorted at all? And did you find this little post of mine to be helpful? Feel free to let me know in a comment! ^_^

Cheers, Lydia

Cabled beanie

Did you guys know you can make cables with crochet? I certainly didn’t, until I came across this post from All About Ami. I’d found a nice chunky yarn which turned out a little too big for the pattern, but I still really like the result:

image

image

image

It should be a bit more slouchy, but because of the thickness of the yarn, it stays up a bit. I hope that through wearing it, the beanie will stretch and slouch more than it does now. Nonetheless, I’m hoping it will soon be cold enough to wear ^_^

I have a little over one skein left over of the same yarn and now I’m indecisive on whether or not I should make some matching cabled wrist warmers… Or maybe I should return the leftover skein and use the money for a different project. What do you think?

Cheers, Lydia

Peacock CAL

A while back I joined a CAL on Facebook in order to make a peacock. I had seen the finished project before and really liked the design, so I decided I couldn’t skip this one.

The pattern was split up into three parts, each of them working on a different part of the bird.
A lot of different colours were needed, but luckily I had them all in my stash ^_^

image

All the required colours

We started with the body:

image

Inside the body there is a length of wire, so you're able to bend and shape the neck

Next came the feathers, which were pretty tedious, but oh so pretty in the end:

image

So many tail feathers, the colours really make them pop!

image

The wings were made up of five different parts and were hard to sew on to the body. But the result looks great

And for the last part we got to make the feet and put everything together. And here’s the result:

image

image

My peacock kind of leans on its feathers and we were supposed to wind yarn around the wire for the feet, but in the end, I really like the result ^_^

The CAL was organised by a closed group on Facebook called Yvonne’s gratis haak patroontjes. If you join, you can find the pattern parts in the files section.

Cheers, Lydia

Tomofair 2014

Hello everyone!

Last week I had my very first experience with selling my handmade cuties to people I don’t actually know! I joined a crafts group called Tegendraads a while back and last week it was finally time for Tomofair ^_^ We had the cutest little stand and I had lots of fun getting to know the other girls (two of them I already knew, but the other two were new to me, besides what contact we’d had on the crew forum)

Pretty much every dealer in the room had a boatload of cute with them at a rather low price. So a lot of people came by to look, but business seemed a little slow. Despite that, I believe I’ve done pretty well and I can’t wait for the next Tegendraads stand ^_^

Not much more to say about it all, really, so here are some pictures:

The entire stand

The entire stand

There were some gaps because one of the members was a bit late. Sadly, I didn’t take any more pictures of the stand after she arrived >_<

I love the Jellyfish Tamara made

I love the Jellyfish Tamara made

We had a great mix of different stuff

We had a great mix of different stuff

Can you spot my work? ^_~

For now, it will be a while before we get to another convention. Probably somewhere at the beginning of next year we will be able to have a stand again. In the meantime, I can work on getting some stock (which turned out to be a bit harder than I’d imagined, it takes a whole lot of crochet to fill a stand ^_^”)

Have you ever sold your handmade items at a fair or convention? If so, share your experience in the comments ^_^

Cheers, Lydia

Catbus revisited

One of my earlier patterns was that of a Catbus, from the movie My Neighbour Totoro. I made one for a friend of mine when I started writing my own patterns. Sadly, when I wanted to make another one, I realised I never fully wrote out the pattern. So when I decided I wanted to make a catbus for the Tegendraads stand at Tomofair this October, I took out my old notes and revised them. And wrote them down in full. So I can make this new, ‘improved’ catbus over and over again.

image

Catbus all in parts

image

Inside out

image

All put together

image

Working on the face

image

A big smile for the camera

image

All ready to take you wherever you need to go!

I’m pretty pleased with the result, especially since I dabbled a bit in changing colours and carrying the yarn as I went. I’m not sure if I will ever post the pattern on here, since the instructions are clear to me, but hard to put into understandable terms. Plus, the pattern is huge! So it would take a lot of time to type up and I don’t have the time or motivation for that right now ^_^” you guys will have to make due with the pictures for now, but if you’re at Tomofair on October 4th swing by the Tegendraads stand and come admire it in real life ^_~

Cheers, Lydia