Merry Christmas!

Goodmorning everyone and merry Christmas!

The great thing about being crafty is being able to make my own decorations ^_^
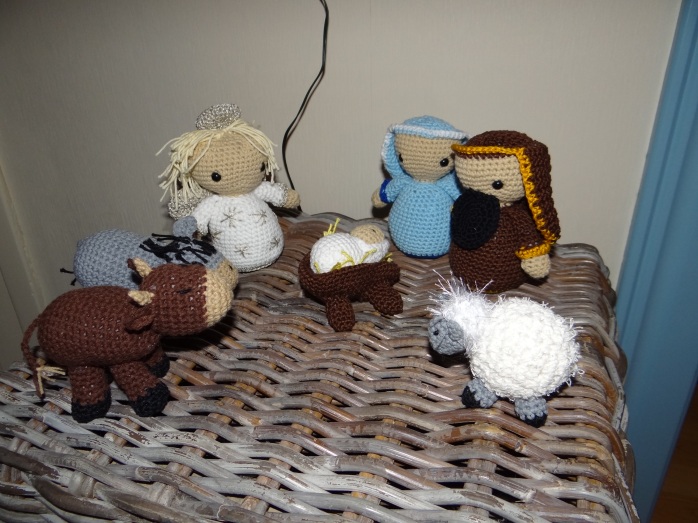
The first big project I ever worked on was a Christmas scene, the pattern for which I found in a Dutch arts and crafts magazine the grandma of my boyfriend just happened to have a subscription to.

DSC02605

I kind of still want to re-do the sheep, because I changed the fuzzy yarn I used after I finished the head. But on the other hand, I quite like it and don’t really feel like making it again. This whole thing took me weeks to complete and actually wasn’t finished until New Year last year (this year? anyway…)

This year a friend of mine found a pretty fun-looking pattern online and suggested that we make it. We try to get together once every month to work on some crochet projects, have a cup of tea and keep in touch. This pattern she found was a bit of a challenge, cause it consisted of many different parts and took a lot of sewing together. I would like to make it clear that sewing is not my strong point. But I still like the way it turned out.

Gingerbread house frontGingerbread house back

If you click the pictures, you get taken straight to the site with the pattern, nifty eh?

The last decoration I made came from a package deal. Basically, it’s a big bag with a pattern and all the materials you need included. Sadly, I think the yarn you get with these kinds of packages is usually not as nice to work with as the yarn I usually use and the stuffing is a bit too stiff for my tastes. But then again, it is pretty handy to have everything together in one buy, especially when a pattern uses colours you wouldn’t usually have in your collection. (yes, I know, every crocheter who is even remotely serious about themselves has every possible colour they could ever need, but humor me ^_~)

Package deal reindeer

Next to making my own decorations, it is also very convenient that I’m able to make presents. Some of you may have already seen the giant moogle head I posted a while back. That is actually part of my Christmas present to my sister-in-law, who asked me to make her a life-sized Mog. (it’s almost done and I need to finish it before tomorrow!)

A friend of mine also asked if I could make him something to give as a present, and his request was a bit.. well, unusual, but certainly Christmas related.
Meet Mr. Hanky Poo from the show South Park:

Mr. Hanky Poo in his natural environment Mr. Hanky Poo

Yeah, my cat doesn’t know what to make of him either 😛
This was another project where I didn’t use a pattern, but more or less just improvised using pictures online and seeing where my imagination led me. Now, I’m a bit sad that I didn’t write a pattern down for him, but then again, it should be pretty easy to work out how I made it if I every do wish to make a pattern out of him.

Well, that’s pretty much it for me when it comes to Christmassy things. I hope you all have a couple of wonderful days with your family and loved ones!
Now if you’ll excuse me, I’ve got a huge moogle to finish up ^_^”

Cheers, Lydia

A Pattern!!!

Just in time for the holidays, I managed to type out the first pattern I ever wrote down!
It’s Charmander, from the anime (and game) Pokémon.
Pokémon is one of the first games I really got addicted to and it is a dream of mine to one day crochet every single creature from this game. Well, the first 150 at the very least, since I believe there are about 800 different ones right now -_-‘ still, it would be awesome to “crochet them all”!

I looked for a decent pattern for this guy online, but all I could really find were either pictures of crochet Charmanders without a pattern, paid patterns, or patterns that just didn’t really seem to work for me. So I decided to base my pattern on pictures I found, but work it out on my own. So I hereby want to apologise if my pattern is similar to another one out there. If you happen to have a pattern online similar to this one: I did not copy your work, but your pictures could have been my inspiration, so thank you for that!

It isn’t the easiest pattern out there, so remember that you will have to have some skill when making this. Not so much because it uses a lot of difficult stitches (cause it doesn’t ^_^) but because the parts can be pretty small.
I used a 3,5mm crochet hook and the finished project became about 10 to 15 cm in height.
Sorry I don’t have more info or pictures, but I gave the little dude to my sister-in-law for her graduation. If you have any questions or notice any typo’s or other strange things in the pattern, feel free to comment or contact me!

Cheers, Lydia

~Pattern time

Charmander Crochet Pattern

The finished product:

Crochet Charmander

Materials
Orange yarn, Yellow/Crème yarn, a little bit of Red yarn, Blue, White and Black felt, White and Black embroidery thread or a bit of White and Black yarn.

Abbreviations
ch – chain
ss – slip stitch
sc – single crochet
hdc – half double crochet
dc – double crochet
dec – decrease
st – stitch
fo – finish off
repeat ** – repeat what is in between **
(x) – x is the amount of stitches you should have at the end of the row

The Pattern

Head
With orange yarn
Round1: Ch2, 6sc in second chain from the hook (6)
Round2: 2sc in every st (12)
Round3: *2sc in first st, 1sc in next*, repeat ** 5 times (18)
Round4: *2sc in first st, 1sc in next 2st*, repeat ** 5 times (24)
Round5: *2sc in first st, 1sc in next 3st*, repeat ** 5 times (30)
Round6-12 (7 rounds): 1sc in every st around (30)
Round13: 1sc in first 12 st, 2sc in next 6 st, 1sc in next 12st (36)
Round14: 1sc in first 12 st, *1sc in next st, 2sc in following st*, repeat ** 5 times, 1sc in next 12st (42)
Round15: 1sc in every st around (42)
Round16: 1c in first 12st, *1sc, dec1*, repeat ** 5 times, 1sc in next 12st (36)
Round17: 1sc in first 12st, dec 6 times, 1sc in next 12 st (30)
Round18: *1sc in first 3st, dec1*, repeat ** 5 times (24)
Start stuffing the head
Round19: *1sc in first 2st, dec1*, repeat ** 5 times (18)
Round20: *1sc in first st, dec1*, repeat ** 5 times (12)
Finish stuffing
Round21: dec 6 times (6)
fo, leaving a length of yarn to sew the hole shut.

For the eyes, cut two large ovals out of blue felt, two slightly smaller ones out of black felt and two small ovals out of white felt. Glue or sew them on top of each other and attach them to the head.
Embroider on a mouth and two slits for the nostrils with black thread.
Embroider two small teeth on the bottom of the mouth with white thread.
See picture if you get stuck.

Body
With orange yarn
Round1: Ch2, 6sc in second chain from the hook (6)
Round2: 2sc in every st (12)
Round3: *2sc in first st, 1sc in next*, repeat ** 5 times (18)
Round4: *2sc in first st, 1sc in next 2st*, repeat ** 5 times (24)
Round5: 1sc in every st around (24)
Round6: *2sc in first st, 1sc in next 3st*, repeat ** 5 times (30)
Round7: 1sc in every st around (30)
Round8: 1sc in first 12 st, 2sc in next 6 st, 1sc in next 12st (36)
Round9-13 (5 rounds): 1sc in every st around (36)
Round14: *1sc in first 4 st, dec1*, repeat ** 5 times (30)
Round15-17 (3 rounds): 1sc in every st around (30)
Round18: *1sc in first 3st, dec1*, repeat ** 5 times (24)
Round19 and 20 (2 rounds): 1sc in every st around (24)
Round21: *1sc in first 2st, dec1*, repeat ** 5 times (18)
fo, leaving a length of yarn, stuff the body and sew it to the head.

Front paws (make two)
With orange yarn
Round1: ch2, 5sc in second chain from the hook (5)
Round2: 1sc in every st around (5)
Round3: 2sc in every st (10)
Round4 and 5 (2 rounds): 1sc in every st around (10)
Round6: *1sc in first 4st, 2sc in next st*, repeat ** 1 time (12)
Round7-11 (5 rounds): 1sc in every st around (12)
Stuff the paws
Round12: dec 6 times (6)
fo, leaving a length of yarn to sew the hole shut and to sew the paws to the body.
Embroider three small claws on the front of the paws with white thread.

Tail
With orange yarn
Round1: ch2, 5sc in second chain from the hook (5)
Round2: 1sc in every st around (5)
Round3: 2sc in every st (10)
Round4: 1sc in every st around (10)
Round5: *1sc in first 4st, 2sc in next st*, repeat ** 1 time (12)
Round6-15 (10 rounds): 1sc in every st around (12)
Round16: 2sc in first 4st, dec 4 times (12)
Round17: 1sc in every st around (12)
fo, leaving a length of yarn to sew the tail to the body with the decreases of round 16 facing upwards. Stuff the tail and sew it onto the lower back of body.

Hind legs (make two)
With orange yarn
Round1: Ch2, 6sc in second chain from the hook (6)
Round2: 2sc in every st (12)
Round3: *2sc in first st, 1sc in next*, repeat ** 5 times (18)
Round4-6 (3 rounds): 1sc in every st around (18)
Round7: *1sc in first st, dec1*, repeat ** 5 times (12)
Round8: *1sc in first 4st, dec1* repeat ** 1 time (10)
Round9-12 (4 rounds): 1sc in every st around (10)
fo, leaving a length of yarn to sew the feet to the legs.
Stuff only the bottom part of the legs! You need to flatten the top part a bit and sew it to the sides of the body.

Feet (make two)
With orange yarn
Round1: Ch2, 6sc in second chain from the hook (6)
Round2: *1sc in first st, 2sc in next st*, repeat ** 2 times (9)
Round3-8 (6 rounds): 1sc in every st around (9)
Stuff feet slightly
Round9: *1sc in first st, dec1*, repeat ** 2 times (6)
fo, leaving a length of yarn to sew the hole shut.
Embroider two claws on the feet with white thread and sew the feet to the legs.

Tummy
With yellow or crème yarn
Round1: Ch2, 6sc in second chain from the hook (6)
Round2: 2sc in every st (12)
Round3: *2sc in first st, 1sc in next*, repeat ** 5 times (18)
Round4: *2sc in first st, 1sc in next 2st*, repeat ** 5 times (24)
Round5: *1sc in first 9st, 2sc in next 3st*, repeat ** 1 time (30)
fo, leaving a length of yarn to sew the tummy to the front of the body.

Underside of the tail
With yellow or crème yarn
ch16, start from the second ch from the hook
1sc in first 7ch, 4hdc, 4dc, ch3 and continue on the other side of the chain, 4dc, 4hdc, 1sc in next 3ch, 1ss, fo leaving a length of yarn to sew to the underside of the tail.

Flame
With orange yarn
Round1: ch2, 4sc in second chain from the hook (4)
Round2: *1sc in first st, 2sc in next st*, repat ** 1 time (6)
Round3: *1sc in first st, 2sc in next st*, repeat ** 2 times (9)
Round 4 and 5 (2 rounds) 1sc in every st around (9)
Stuff the flame a bit
Round6: *1sc in first st, dec1*, repeat ** 2 times (6)
fo, leaving a length of yarn to close the hole and sew the flame onto the tip of the tail.
Using red and yellow threads of yarn sew loops onto the flame to create a fiery look (see picture). You can off course also use bits of red and yellow felt and sew or glue them onto the flame.

And your Charmander is all done!

Note that Charmander and all other Pokémon are copyright of Nintendo.
Please do not sell or publish this pattern as your own. If you do use it, please do give credit to me and link back to my site, thank you in advance!
Early works

When I look back on the things I made in the beginning, I find it pretty amazing that I’ve grown this much in the last year and a half. For me, starting this blog has given me the opportunity to look back on my own progress and the things that baffled me in the beginning.

The very first crochet-pattern book I bought was “Super Super Cute Crochet” by Brigitte Read. It has 35 patterns for different animals. So far, I believe I have only made about three of the patterns from it, but the first two ami’s I made came from this book. The one that made me fall in love with the book, was also my very first crochet project was a whale.

my very first amigurumi

my very first amigurumi

It had some basic stitches, nothing too difficult, except for the tail (which consists of triple crochets and turned out to be pretty impossible for me to do so quickly after starting, so my mother-in-law did it for me). Now I use it as a pin-cushion, which makes it all the more amazing, it looks like a narwhal because of the huge needle I put in its forehead.
What attracted me the most in this pattern, was that it wasn’t all that lifelike and it had a really cute look about it thanks to the huge eyes. Unfortunately, it was pretty impossible for me to find proper safety eyes, so I had to embroider them on, same as the mouth. As you might notice, my embroidery skills are sucky to say the least, but still, I think this little guy has the perfect look for a first time crocheter.

I made my second project for my boyfriend, who had just started playing Minecraft at the time. Therefore, I believed, a square cow could not be missed!

Square cow

This became my first practice at crocheting in rows instead of rounds. As it turned out, making something square out of yarn was a bit more difficult than I expected.
In the end, I really like how it turned out though. It shows that I was inexperienced, but at the same time, it shows how much I’m trying to get it right. And to my boyfriend it didn’t really matter how it looked, he knows that it came from the heart 😉

Then, I got a book from Cristel Krukkert from a co-worker. Her patterns are a bit more cute and cartoony, but they certainly had great charm for me. I started making these animals as presents for newborn cousins of mine. Most of the projects were bigger than normal amigurumi, but they were still a lot of fun to make. Even though the patterns are larger, they consist mostly of many different parts, which makes for a less boring project. To be honest, I have the attention span of a hamster, so making parts that require me to do the same thing for several rounds quickly bore me.

The next thing I fell in love with was fuzzy yarn. It is both the most annoying and most amazing yarn to work with. It’s really hard to see your stitches, so it takes quite a bit of time to figure out if you’ve got the right amount. But at the same time, because it is so very fuzzy, you can’t really tell if you’ve missed a stitch, so it’s very forgiving. I started using this yarn for several different projects. For pretty much any animal, you can find a part that looks great in fuzzy yarn.

My first attempt at using fuzzy yarn.

My first attempt at using fuzzy yarn.

Over time, I started to make bigger and more compicated stuffed animals and when my pattern books did not seem to be sufficient  anymore, I turned to the internet.
There, I found that it was pretty easy to find free patterns in english and luckily, finding a translation scheme wasn’t too hard either. But when eventually the seemingly endless pool of patterns ran dry, I realised I had to start to try and make my own.

The first thing I ever made without a pattern was a Creeper (from the game Minecraft).

Foto0416

Thinking back now, I didn’t have too much trouble figuring this little guy out. I never wrote out the pattern, I just started trying and it kind of came to me. I have to admit, there isn’t much of a pattern to this guy. He basically consists of three square blocks, held together by split pens which make it possible to turn the head and feet. I managed to keep it more square by using some squares of cardboard in the bases.

So that’s pretty much a cronological telling of my earliest works.
I realise how very boring these posts may be to my reader(s), but then again, I simply could not start a blog with patterns out of the blue without so much as a little background. I do promise however, that my next post will hold a pattern!

Until then,
Cheers, Lydia

How it all began…

About a year and a half ago, I had too much free time on my hands. In a way, just drinking tea, reading a good book or watching my favorite shows on tv just wasn’t good enough for me anymore. I decided I needed to do something productive with my life. So I set out on the great quest to find myself a genuine, real life hobby.

Now, I never thought of myself as very talented. I couldn’t draw very well, got bored quickly with making music and I certainly couldn’t see myself writing a book (even though I have sure read my fair share of them). Basically, what I needed was something to pass the time where I didn’t have to think too much, or be very creative myself.
There was one thing I loved and that’s going to anime conventions. And on one of those, I found the inspiration I needed.

Among the many stands with manga, dvds and figurines, there were a couple of ‘arts and crafts’ groups. The one that caught my eye was that of a small handcraft group called ‘Tegendraads’. They sell their own amigurumi, tote bags, felt plushies and pretty much everything you can think of that can be hand-made. Especially the amigurumis: small, crocheted dolls, got my attention. Of course, I am no stranger to the great and all-knowing medium that is The Internet, so I had seen some pictures of those cute little guys float by in my days online. And that’s when I thought: “Hey, here’s something I can do! (I hope)”

So when I got back home after a wonderful weekend, I set out to find a pattern book. That sure wasn’t too hard to find, since the fine art of amigurumi making had just blown all the way from Japan to the Netherlands. As I soon found out, crocheting dolls and toys wasn’t all that new in the craft-world and plenty of books could be found. So I picked one up cheap at an outlet bookstore, just in case it turned out that I sucked at it.
My mother had crocheted quite a bit in her younger days and she let me have all of her hooks. I picked up some wool and stuffing from the craft store and settled in at home to start with my new way of life.

That’s when, much to my horror, I realised I am a lefty. And it just so happens that all the stitches are explained in a right-handed way. I quickly saw my dream of becoming a crochet-goddess falling to pieces. Everyone in my family is right-handed, they even had to ask a friend of the family to help me out with learning to tie my shoelaces.
But I had despaired too soon. That evening we went to eat with my family-in-law and I decided to take my equipment with me to try and practise for a bit. As it turned out, my mother-in-law could crochet as well. She showed me how to do the stitches, we tried together and low and behold: I actually learned to crochet right-handed!

My first few projects were a bit messy and clearly showed I was a beginner, but pretty soon I got the hang of it and learned more about how to do certain stitches and what looked good and what didn’t.
The finished products make great baby-gifts and more and more of my friends started to make requests. As I started to want to make more, it turned out that just the pattern books weren’t going to cut it. So I ventured out to the most trustworthy of media in order to find more and, most importantly, free or cheap patterns. The internet is a great friend to have! Most patterns I found were in English, which made it hard for me at first. But luckily, pretty much anything can be found online. So a translation scheme was googled and onwards I went, deeper into the glorious and cute world of amigurumi.
But suddenly, there I was, asked to make something there was no pattern to, or at least, not one that met my needs. So I went one step further and decided to try and make a pattern of my own. After quite a bit of fidgeting, trying and taking things apart, I succeeded. I had never expected I would be able of such a thing and I guess I was pretty much the only one who hadn’t thought I would be able to do it.

So nowadays, I make a mixture of my own patterns and those that others kindly share with the world, either be it in a book or online.
And then, one gloomy fall-afternoon, I decided it was time to go ahead an share my work with the world, as so many others have done before me.

Which brings us here. Basically, to make an awefully long story short: I hope to give back a little to the crochet-community and the world, for letting me in on this amazing secret and passtime. And I hope you will all enjoy my work as much as I enjoy yours!

Cheers, Lydia